Whenever clicking a picture, your squad would asked you to use your iPhone to get the perfect quality photos and later send them to the group. While you are a proud iPhone owner, do you feel that the photo is not that professional and would create a bad impact of your photography amongst your friends?
Well, it's pretty common peer pressure for you; honestly, being the sole iPhone owner among your friends isn't an easy feat. As you are looking for how to edit pictures on iPhone, I, being a professional photographer for 8+ years, have covered you all with it!
How to Edit Pictures on iPhone to Make Them Look Professional?
iPhone always captures excellent photos. But if you are picky or need professional quality photos, it won't satisfy you. After all, the iPhone's camera isn't as good as a DSLR!
Yet, plenty of editing features built into the iPhone will give it an enhanced appeal.
Follow the steps below:
1. Update your iPhone
The most vital step is to update your iPhone to the latest version to use comprehensive features with good optimization. An obsolete version doesn't support all the features, and even the Photos app from which you have to edit would act buggy.
- Head over to iPhone Settings and go to General.

- In it, select Software Update.
Ensure that there's an active internet or WiFi connection during the process. Your device would look for the latest iOS updates compatible and prompt you to update if any. However, if it's already updated, then the following sections will help you!
2. Create a Copy of the Original Picture
If you are someone who has difficulty in making decisions and is too picky or confused, then it's always a better idea to create a Copy of photos. This is because you lose the original image as you edit, and sometimes you might need it. Therefore, duplicating it is a better idea.
- Open the Photos app and the image which you want to edit.
- Tap the Share icon, like dots over two lines, and select Share from the pop-up menu.

- Click the Back arrowhead icon to go back, and the copied image will be towards the end of your gallery.
Next, you can proceed to edit this duplicated image. It is noteworthy that you can also undo edits and revert it to the original. However, sometimes you need both the original and edited image, so copying the image is a wiser idea.
3. How to Edit Photos on iPhone For Instagram For Free?
For your Instagram, you would want your pictures to be perfect in size and layout. Besides, having an additional area in them doesn't let full pictures fit and sometimes makes the photos less appealing. To tackle such issues, the iPhone enables you to crop, Rotate, and Flip images to perfection with the Photos app.
Crop Your Image
You would have pictures that contain the area where you don't need to focus. In other words, it includes an additional area. Here's where you can crop your images to perfection.
Besides, as a social media user, you would know that square photos fit perfectly and look good on IG and not others.
- Tap the Edit icon at the top and select the Crop icon from it.
- Fit the rectangle into the chosen region to crop your photo manually.

Additionally, you can resize the rectangle or pinch the picture for zooming in.
- To use the picture on Instagram, tap the grid-shaped icon at the top-right and select Square from the bottom menu.
Additionally, you can try other options like Wallpaper 16:9, 5:4, and more for such different requirements.
Rotate Your Photo To 90° Or More
When you have captured the photos in 360° and want to make it normal because it doesn't look how it should look, rotation helps. Further, if you have clicked through a photo in Landscape and want the Portrait mode or vice-versa, Rotation helps!
- In the Edit options, select the Rotate (square with curved arrows) icon.
- Tap to rotate it by 90 degrees.

Similarly, you can tap more times if you want a rotation of more than 90°.
Flip Horizontally Or Vertically
Suppose you click a picture near your car's dashboard and want the steering wheel on the left; flipping it horizontally works. Similarly, you would like to flip it vertically, like if there's an object and you want to turn it upside down.
- Tap the Flip vertical or horizontal icon as you require.
Now, click Done to save the changes.
4. iPhone Picture Editing Hack: Straighten and Adjust Perspective
You often feel that your photo is tilted or you don't look much taller. Otherwise, if the image seems to be clicked from the wrong angle, you can fix it.
Straighten Images on iPhone
- Open a picture in Photos.
- Tap Edit on the top-right corner and click the square icon with two curved arrows.

- Tap the Straighten option and use the slider to tweak it as per your requirements.
iPhone has gridlines to assist you with straightening the picture.
Change the Vertical or Horizontal Perspective of the Image
When you feel that the angle of the picture isn't correct, then changing the perspective helps. Vertical perspective allows you to raise the image or reduce the raised part as per the image's perfection. Similarly, if the left or right side doesn't appear perfect or raised, then the horizontal perspective helps.
-
Preview the photo and tap Edit.
-
Click the square icon with two curved arrows.
-
Tap the rectangle icon, which has a strike-through line.

-
Now tap the Horizontal or Vertical Perspective icon as per your requirements.
-
Save your changes.

Often, when you feel you appear short-heightened, adjusting your vertical perspective helps.
5. Best Photo Edit Settings iPhone- Adjust Light and Color
When you need professional-level photos, the automatic settings of your iPhone camera won't seem enough. But the image is already captured, and adjusting ISO and white Balance is a bit of a pesky task. Here's where you can use the light and color settings.
Automatically Adjust Light And Color With Auto Enhance
The Auto Enhance feature uses AI to automatically apply specific preset changes that would enhance your photo with minimal effort.
- Open the photo and tap Edit at the top right corner.
- Click the Auto-Enhance icon, which adjusts the light, colors, and other levels of your pic in one click.

When you tap the icon, it changes the icon color to Pale Gray. You can undo the changes if required. Besides, there's a slider to tweak the level of auto-enhancement in the picture. Yet, most users are disappointed as Auto-enhance doesn't make the photos look professional.
Therefore, manually adjusting every setting is the only workaround!
Exposure To Brighten or Darken Your Photo
When your image is brighter or darker than usual, you can use the Exposure tool to adjust it per your preferences.
- Open the image in your Photos app and tap the Edit icon at the top-right corner.
- Select the meter-shaped icon at the bottom to Adjust the light and color of your photo.

- Tap the first icon to tweak the Exposure.
- A slider appears; drag it to the right to brighten it and vice-versa to darken it.
Yet, it's different from the Brightness and Contrast feature. This is because it tweaks the highlights of your photo more, and the darker tones are primarily unaffected.
Brilliance
Brilliance, as the name denotes, states that your images turn out to be brilliant. For that level of perfection, what can be more extraordinary if the shadows are lighter and highlights are a bit more intense or vice versa?
- In the Image editing options, tap the Adjust icon.
- Select the second icon to modify Brilliance.
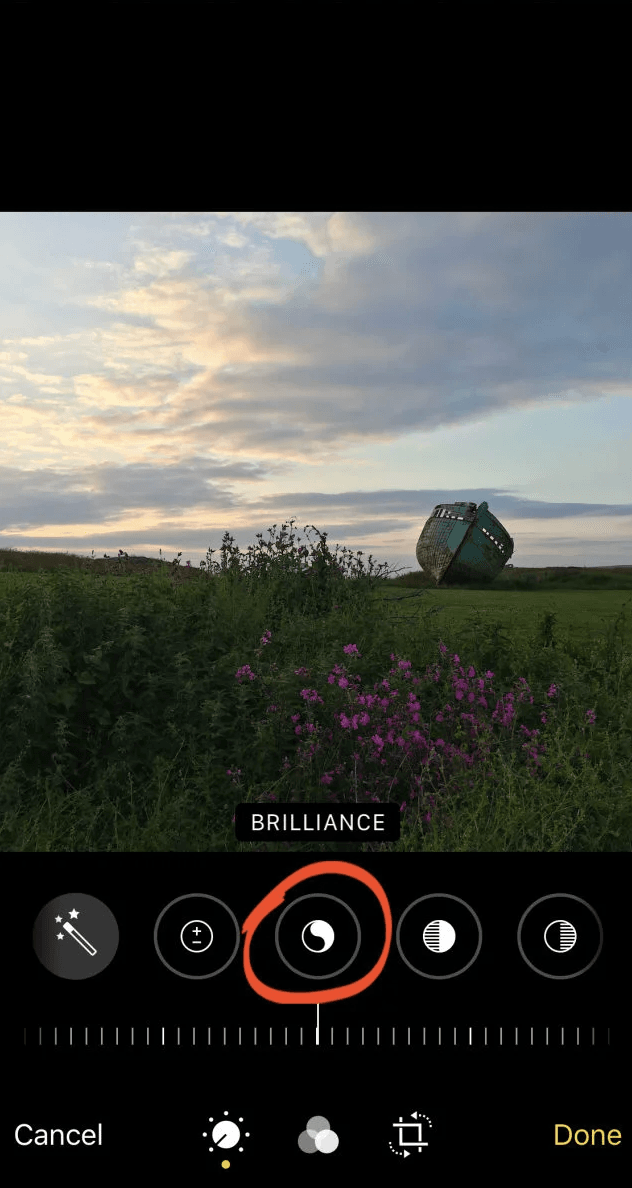

When you drag the slider toward the right, highlights become dark, and Shadows turn lighter. While sliding it towards the left has the opposite effect.
Highlights
Do the brighter tones of your picture look quite imperfect, or aren't as appealing as they should be? Here's where Highlights help you modify the brighter tones of your photo.
- Tap the icon next to Brilliance to adjust the Highlights of your image.
- Shift the slider towards the right so that your highlights show brighter contact while the left has the vice-versa effect.
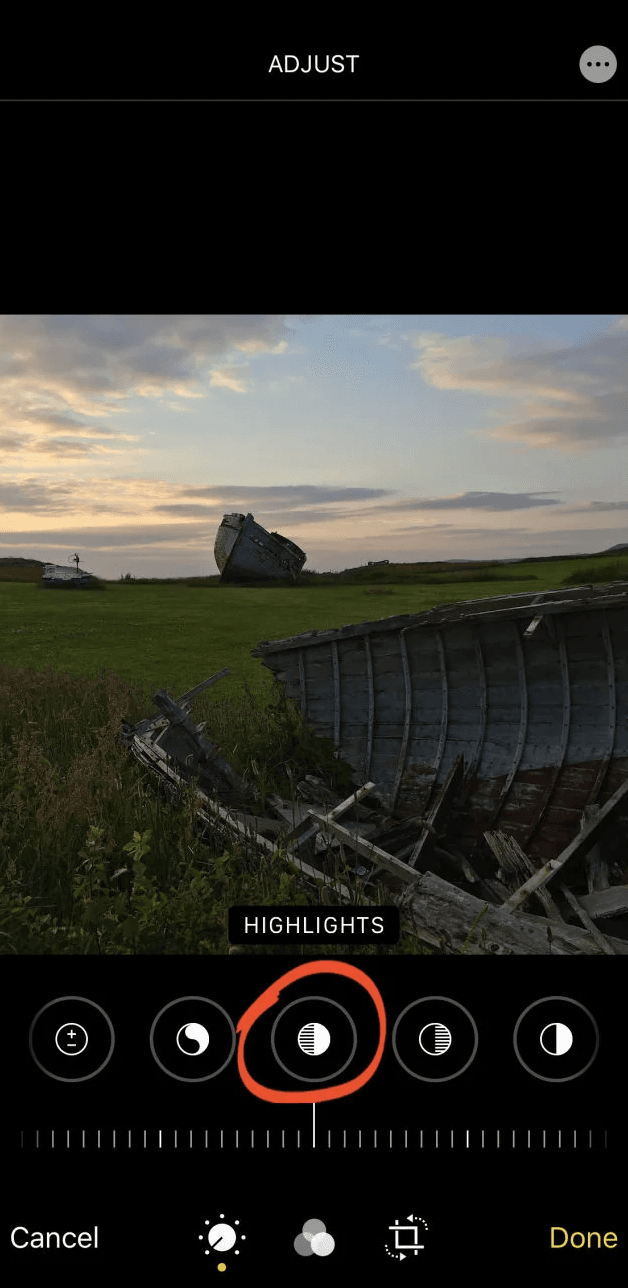

The Highlights are the brighter and more vibrant tones of your image, while Shadows are apparent from the name itself.
Shadows
In professional-level editing, Shadows have a more significant role to play. Shadow photography and even shadows of people to objects must be perfect to make the pictures more realistic. If they aren't deep dark, then the photos don't look good. Moreover, Shadows refer to overall darker areas of your image and not merely a shadow.
- Tap the Shadows icon, which is next to Highlights.
- Its slider will appear; drag it to the left to make the Shadows look darker, while moving toward the right will make it lighter.
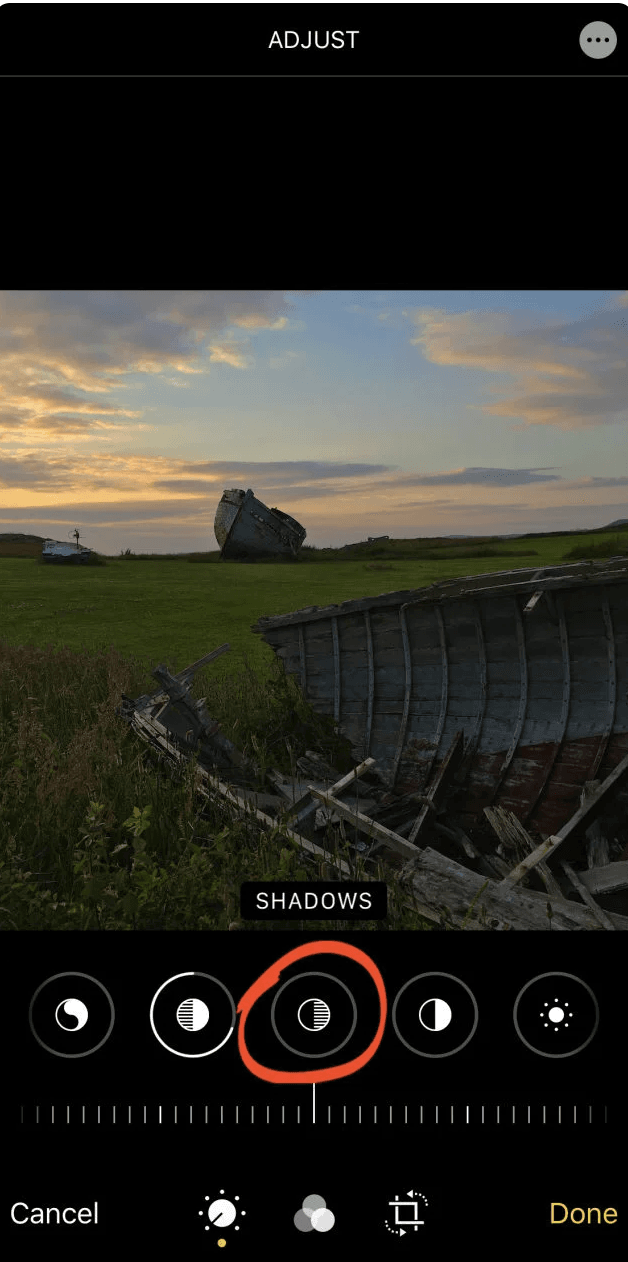

Lightening it helps to brighten the dark tones when those make your photo look ugly.
Contrast
Striking the perfect balance between the Shadows and Highlights of your photo is vital. It refers to an ideal blend of brighter and darker areas in your image to complement each other.
- Tap the Contrast icon next to Shadows.
- A slider appears; drag it towards the right to increase contrast, making the highlights lighter and Shadows darker.

Besides, dragging it towards the left will have the opposite effect. You can use the Contrast feature when you have to adjust the Shadows and Highlights in combination for the perfect sync in Photos.
Brightness
Brightness, when adjusted positively, improves the light of your picture by making it brighter. Using the slider on the negative side would make the image less bright.
- Tap the Sun-shaped icon beside Contrast to open the Brightness setting.
- The slider appears; drag it to the right for a positive effect or to Brighten the image, while vice-versa will have a negative or darker effect.
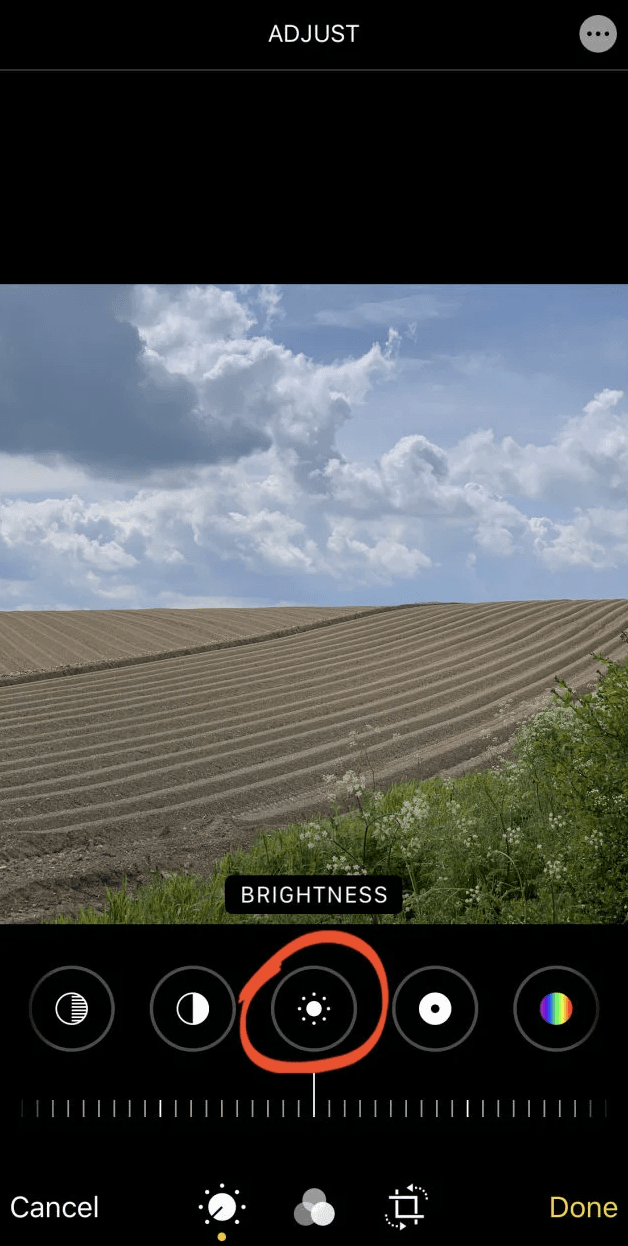

The Brightness feature is quite similar to Exposure; it adjusts the Shadows and other shades of the image as well. Hence, it's better than Exposure.
Black Point
When the darker shades of your image aren't that vibrant or lack black pigmentation, then Black Point helps.
- Tap the Black Point icon at the right of the Brightness icon.
- Drag the slider towards the right to have the proper deep dark pigments.
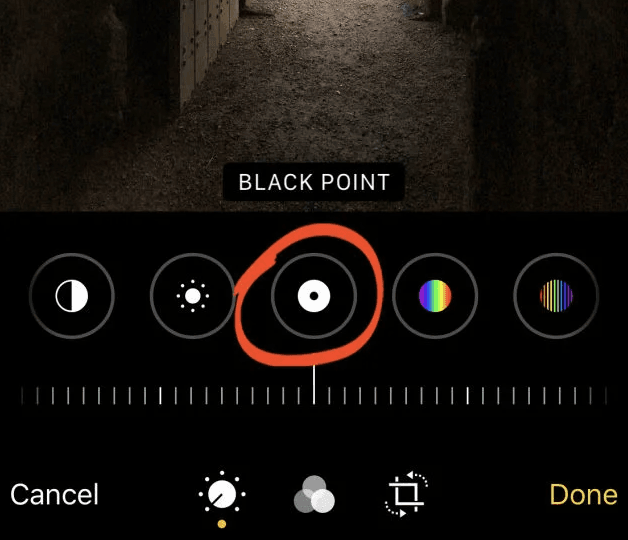

However, if the darker tones are intensely dark to look natural and professional, you should reduce the Black Point by dragging the slider towards the left.
Saturation
When the colors of your photo aren't that lively, look faded, or are so vibrant that they don't look lively, Saturation helps.
- Tap the Saturation icon beside the Black Point.
- Move the slider toward the right for more vibrant, rich, and lively colors.
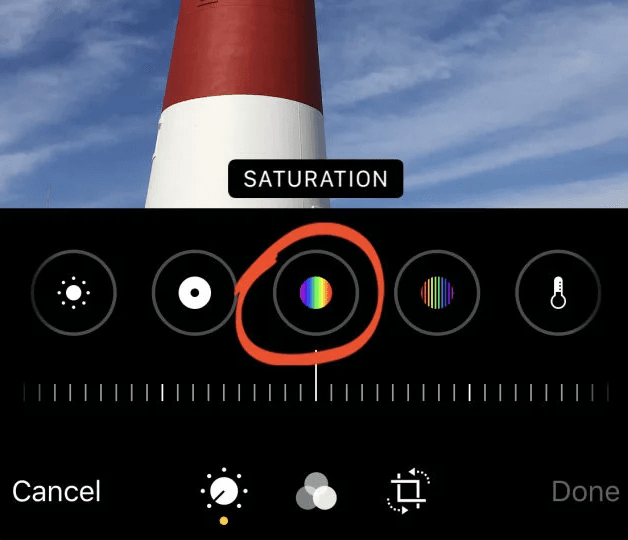

Besides, if they are already more saturated, then decrease the saturation levels. Moreover, you can also use the feature you make your image B&W; drag the slider to -100 for it.
Vibrance
Sometimes, your photos have specific colors faded, due to which your image doesn't look as good and rich as it should. Here's where the Vibrance tool helps you to improve the muted colors of your picture.
- Tap the Vibrance tool next to the Saturation icon.
- Increase the levels of Saturation to improve the colors of the faded regions of your photo and make it look lively.

If you over-saturate the image, decrease the Saturation levels for a more pronounced effect.
Warmth
When the colors of your photo, like yellow, orange, red, and similar shades, have a missing color balance, Warmth helps.
- Select the Warmth icon, which looks like a thermometer, next to Vibrance.
- Increasing the levels of Warmth with a slider will make the colors warm and improve their effect.

Besides, decreasing the levels would make your photo if they are too bright.
Tint
The Tint feature plays a significant role in Nature photography. It increases the levels of Green or Magenta pigment in your photo naturally. The former is essential in nature photography while the latter helps to enhance when your image is quite color.
- Tap the Tint icon at the right of Warmth.
- Adjust the slider by increasing its levels to add a magenta tint while towards the left add a green tint.

Ensure not to add many tints, as your image won't look realistic. Ensure perfect synchrony between the colors.
Sharpness
If the pixels of your photo look a bit distorted in several places, then adjusting the Sharpness helps. It makes your image look crisp and ultra-clear.
- Tap the Sharpness icon at the right of Tint.
- Increase the levels of Sharpness by dragging the slider toward the right.

Besides, if you make it so sharp that the photo is no longer rich, drag the slider towards the left.
Definition
When the image seems slightly blurred, the pixels appear blurred, and the resolution isn't better; the next step after Sharpness is to adjust the Definition.
- Tap the Definition icon next to Sharpness.
- Drag the slider towards the right to improve clarity and Definition, while the left would have the opposite effect.

Noise Reduction
When your image appears too grainy, which usually happens in low-light conditions, you are one step away from the perfect shot.
- Tap the Noise tool, which is next to the Definition.
- Drag the slider to the right to reduce noise or the grainy texture, and decreasing its levels would increase the noise.

But use the tool only when required, significantly it would deteriorate the quality. Further, reduce the noise to a certain level and not much else; it would look like an illustration.
Vignette
When you want the edges of your image or the area outside of the focus to look darker or lighter than the rest, Vignette helps.
- Tap the Vignette icon at the right of Noise.
- Move the slider on the right to increase the darkness at the edges while doing the opposite would lighten it.
- Click Done to save changes.
It's noteworthy not to adjust the Vignette a lot, or else it would deeply blacken or whiten the edges of the image.

6. Add Filter Effects
If the whole process was a bit longer and you need a bit of editing in substitute or in addition, then Filter Effect presets work.
- Open the photo and tap the Edit icon at the right.
- Tap the three overlapping circles icon at the bottom.
- Select Vivid, Dramatic, and similar Filters to enhance your image.

- Tap the photo to compare it with the Original photo.
If that doesn't look impressive, then choose the Original filter. Don't forget to save your changes.
7. Depth Control
The Depth Control feature, though, is exceptional as it blurs the background area to show a water effect, yet it is available on older iPhone models. Therefore, you have the feature only on iPhone XS to 11 series.
- Open your photo and tap the Edit option at the top right corner.
- Select the cuboid icon at the bottom of the screen.
- Tap f 5.6 at the top-left corner.
- Drag its slider towards the left to increase blur, but moving it to the right decreases the blur.

Now, save changes to your picture.
8. Copy-Paste Best Photo Edit Settings iPhone to Multiple Photos
When you have done edits to your photos that have satisfied you, you would feel to have the same effect on others. Fortunately, the Photos app lets you do so in a few clicks.
- Open the photo, which contains all the Edits.
- Tap the three-dotted icon at the top-right and select Copy Edits option.
- Tap the back arrow at the left to return to Gallery.
- Now, select the thumbnails where you want the edits.
- Tap the three-dotted icon again and choose the Paste Edits option.
Here is the tutorial for Copy-paste photo edit settings to multiple photos.
Copy and Paste Edits on Multiple iPhone Photos
Besides, it's noteworthy that every image would need different levels of colors and presets, and the Photos AI automatically adjusts it.
9. Revert An Edited Photo To the Original on the iPhone
You make too many edits on a Photo to realize that instead of looking professional, it seems unnatural. In such a situation, the iPhone has a workaround to transform the photos back to the Original.
- Preview the Edited photo and tap the three-dotted icon.
- Select the Revert to Original option to undo all the Edits at once.

Thus, you are already without any editing regrets.
10. Write Or Draw on a Photo in iPhone for Creativity
You can even write on the pictures, draw something to mark certain areas, or even text, shapes, and similar to make them more social-media friendly.
- Open the photo you want to annotate.
- Tap the Edit option at the top-right corner and select the pen-shaped icon.
- Use the different tools and choose the Text, Shape, and similar features and make the changes.
- Select Done to save the changes.
This saves all your annotations and adds fun elements to the photo, which is suitable for sharing on Social Media.
11. Unique Photo Editing Settings on iPhone: Change Date, Time and Location of Photos
You can even change the Metadata information of your pictures on iPhone to avoid Copyright infringement issues and similar.
- Open an image and tap the three-dotted icon.
- Select Adjust Date & Time or Adjust Location.
- Input the information you want to add, tap Adjust, and apply changes.
This will save the changes to your image. You can even change the Metadata of multiple photos on an iPhone. Thus, with all these features, you can massively edit pictures on your device.
How To Edit Live Photos on iPhone?
iPhone has a unique feature of letting you click Live Photos as well. Just like your usual photographs, you would need professional quality edits here as well. The Photos app copes well with these features.
- Preview your live photo in the Photos app and tap Edit at the top right corner.
- Tap the Concentric circle icon at the bottom left.
- Now, there are multiple editing options, and you can choose the one you require.

Setting a key photo lets you choose the cover image of the Live Photo. Besides, you can even trim the live picture as per your requirements. You can even convert it into a still image by tapping the Live button.
Further, you can even mute the sound of your live photos and fun VFX to make them into videos. Live, Loop, Bounce, and Long Exposure help you to give pro-level editing to Live Photos as well.
How Do I Remove Something From a Photo On My iPhone?
Though the iPhone has excellent photo editing features, it does miss some crucial ones that are a need of the hour today. Suppose you click a picture which is so good, until you realize there's someone else accidentally captured as well.
Here's where you don't have the feature to remove the person or object. Yet, there's an effective tool that gives a greater level of precision in eliminating things.
-
Go to Imagewith.ai Clearoff.
-
Tap Upload Image and choose the image from which you want to remove the object/person.
-
Tap/Draw on the object you want to remove.
-
Select Download to save changes.
Now, it won't look as if anything existed in your photo. Besides, additional options exist to save the image into the desired format and similar.
How Do You Remove The Background Of a Picture on iPhone?
If you have a photo whose background isn't good or you want to eliminate it to transform it into your profile picture, here, too, you can do it for free on your iPhone. But there's no in-built tool, yet you don't need to install an additional app.
- Visit Imagewith.ai Outcut and tap Upload Image; choose the photo you want to add.
- After the upload is completed, the image background is removed to give a perfect transparent PNG.
- Tap Download to save it on your iPhone.
Additionally, you can also edit the area to remove and even add a colored background to photos.
How Can I Easily Enhance Photos On My iPhone?
While iPhone photo editing has a suite of features, they do require a professional level of expertise. Besides, you need greater effort, observational skills, and time to give that level of precision.
Yet despite all this, its auto-enhance feature isn't impressive, and neither all the tools together do justice to photos. Here's where you can easily see your pictures on your iPhone for free in a few clicks.
- Go to Imagewith.ai Overscaleon your iPhone.
- Tap the Upload option to choose the photo.
- Press the Overscale button to edit Photos on your iPhone easily.
- Select Download to save it on your device.
Imagewith.ai Overscale has two options of 2x and 4x, which convert the image into 2K or 4K resolution. Besides, it automatically adjusts colors, light, hues, Sharpness, and definition to give the perfect professional pop. What else do you need?
The Final Verdict: How to Edit Photos on iPhone Free
If you were looking for how to edit photos on iPhone free, you would have got your answer! The Photos app has a suite of features to let you do so easily. Besides, if you have an older version of the iPhone, then the Depth feature gives a watery and more professional level effect to photos.
Despite all this, the Photos app does lack certain mandatory editing features. These include not letting you remove objects and background, nor does its Auto-enhance work perfectly. Here's where Imagewith.ai has a suite of features, all of which are effective and easy to use.
In it, Clearoff lets you remove unwanted objects, Outcut eliminates the background, and Overscale efficiently edits images for perfect professional levels.
Moreover, you have specific options to save it in the desired format, and it also has particular add-ons. The best part is now you no longer need an iPhone for professional-level editing; you can access it on any device for free. So, Hakuna Matata!
Frequently Asked Questions?
How to Edit Photos on iPhone 13 Pro Max?
You can edit your photos on the iPhone 13 Pro Max like on other models. However, its faster processor and better camera lens give an enhanced appeal to your photos.
How do I edit something out of a picture on my iPhone?
To edit something from a picture on your iPhone, visit the Imagewith.ai Clearoff, update your image, tap the object/person you want to remove and click Download to save it on your iPhone.
How Do I Edit a Photo To Look Professional?
To edit your photo to look professional, visit the Imagewith.ai Overscale tool and upload the image you want to make appealing. The tool automatically enhances it to 2K resolution and adjusts colors to create a perfect synchronization between colors and light, giving it a pro-level appearance.
How do I Photoshop a Picture On My iPhone?
To Photoshop a picture on your iPhone, download the Photoshop Express app and choose the Cutout feature.


